Workflow operations
Project, Platform, Language and Screens Settings
Get the project skeleton right. This determines whether each subsequent step can go down smoothly.
How to fill in `New Project` / `Edit Project`
open form
Create a new project: Click New Project on the home page.
Edit: Click the pencil in the upper right corner of the project card, or click Edit Settings in the workspace Basics.

New Project / Edit Project pop-up window example.Fill in `Project name`
This is the project name that appears at the top of the workspace and is the subject of the default project folder name.
Cannot be empty. When it is empty, Save will directly report Project name is required..
Decide whether to enable App Store / Google Play
The checkbox on the left of Bundle ID (App Store) controls whether the iOS platform is enabled.
Package name (Google Play) The checkbox on the left controls whether the Android platform is enabled.
At least one platform must be enabled, otherwise it cannot be saved.
Checklist
- A Bundle ID of the form
com.example.appis required when enabling iOS. - A Package name in the form of
com.example.appis required when enabling Android.
Select `Location` when creating a new project
Click Choose… to select the parent directory.
After saving, the app will create the project name.autostoreshots folder in this directory.
If the target location already has a project folder with the same name, Project folder already exists. will be reported.
Click `Save` to finish
After saving, the project directory, project.json, and the default 4 screens and 1 en-US locale will be generated immediately.
An ios_min preview size is also enabled by default, allowing you to enter Preview immediately.
Deleting items is physical deletion, not soft deletion
Delete project in Edit Project will directly delete the entire project folder, including raw, renders, exports and all configurations. There is no recycle bin recovery for this action.
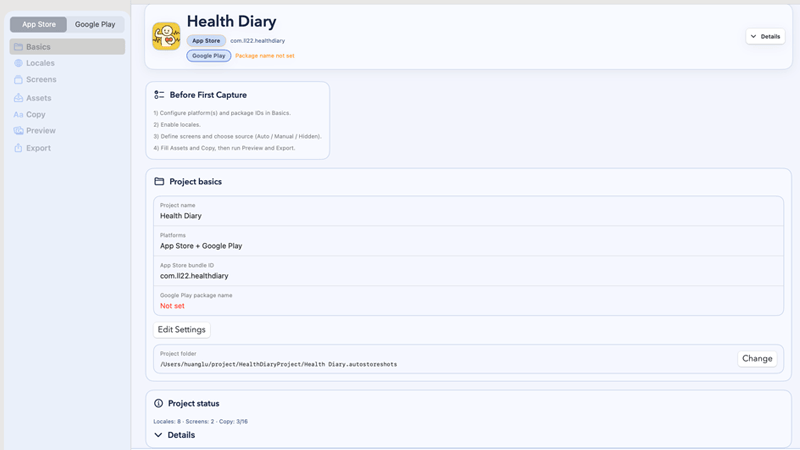
`Basics` What to look at in this step
After entering the project, Basics comes first by default. The goal of this page is not to enter a large number of entries, but to confirm the project skeleton and current blocking points.
Before First Capture: Fixed reminder to configure platform, language, Screens, Assets and Copy first.Project basics: ShowsProject name,Platforms,App Store bundle ID, andGoogle Play package name.Edit Settings: Reopen the project settings form.Project folder+Change: View or reselect the project directory.Project status: SeeLocales,Screens,Copy, deep link completion, Source screenshots coverage and the results of the last run.
Use `Project status` to determine which step to complete the configuration.
If Copy is not filled, go to Copy. If App Store deep links or Google Play intent URLs are incomplete, go to Assets > Auto Sources. If Source screenshots is still 0, it means that you have not uploaded or ran out the original image.
Project status expansion example in Basics page.`Locales`: Manage enabled languages, store codes and custom languages
First understand the `Enabled Locales` area
The checkbox on the left side of each locale card controls whether the language participates in subsequent copy, preview, render and export.
The trash can in the upper right corner will delete this locale.
The Display name in the card can be changed to a display name that your team is more accustomed to, without affecting the underlying locale code.
Use `All` / `None` to quickly batch switch
All will enable all existing languages.
None will disable all. Note: After all are disabled, the bottom Next cannot continue because there must be at least one enabled locale.
Click `Add locales` to open the language selector
The top 3 modes are All supported locales, App Store supported, Google Play supported.
The search box supports entering language names and multiple code snippets at one time, such as es,fr,en,sv.
After checking, click Add selected locales to join in batches.
Add locales and Custom locale operations in the Locales page.When you need a language that is not built-in, use `Custom locale`
Locale code fill in the standard code, such as en-SG, pt-AO, zh-HK.
Display name Fill in the name for the team to see.
After clicking Add custom locale, it will enter the same list as the built-in locales.
| scene | Code seen in the app | How to understand it in the document |
|---|---|---|
| Shared master code | For example es-MX, zh-Hans | A 'shared canonical locale' will be saved internally in the project first, and will be mapped to App Store / Google Play later. |
| Google Play and App Store codes are different | For example, es-MX will be mapped to Play's es-419 | You usually only need to maintain shared code in a project, export and run it, and then convert it to the target platform code. |
| Android language switching | For example, zh-Hans will eventually be converted to zh-CN | The Android side of Auto Capture will use internal locale mapping, so you don’t need to do manual secondary conversion. |
Why does the documentation always say 'shared locale'?
Because the app internally unifies the language into a set of shared code, and then converts it to the App Store / Google Play target code when running and exporting. The advantage of this is that Copy, Preview, and Template tuning do not need to maintain two language trees.
`Screens`: Define what each picture is taken, how to sort it, and where it comes from.
Screens determines 'which pages should be produced in each language', not the size. Sizes are managed in capture sets and Templates. The default project will first have 4 screens. You can continue to add them, or delete them and rebuild them.
| Field/Button | effect | What should you pay special attention to? |
|---|---|---|
Name | The business name of Screen is also the basis for generating shot key. | Cannot be empty; duplicate names will prevent continuation. |
Source | Decide whether this image is from Auto, Manual or Hidden. | Auto requires deep link; Manual requires upload; Hidden skips Auto Capture but keeps this slot in Preview / Render / Export. |
Order | Determines the export order and default filename prefix. | Must start at 1; consecutive recommended. |
| garbage can | Delete the current screen. | After deletion, the relevant Copy, Upload coverage and export file name will change accordingly. |
Sort by order | Reorder the current list by Order. | It is recommended to click once after changing the order to avoid inconsistency between the visual order and the actual export order. |
Add screen | Add a new screen. | If you want to go to the App Store, it is more reliable to have at least 4 pictures; the app will also give recommendations. |
| Source options | actual meaning | What scene is suitable for |
|---|---|---|
Auto capture (open Deep Link) | Automatically open the deep link during runtime and wait for the specified milliseconds before taking a screenshot. | You can stably land on the specified page, and you want to run multiple languages and sizes in batches. |
Manual upload (you provide screenshot) | You provide the original screenshot file yourself. | Real machine screenshots, third-party pages, complex login states, and pages that cannot be deep linked are required. |
Hidden (exclude this screen) | Keep the screen slot and skip Auto Capture for it. | Poster-only slots, temporary placeholders, or pages you do not want to auto-shoot now. |
On Android, Feature Graphic appears as a dedicated card in Screens. After enabling it, the default source is Auto capture (open Deep Link). If that page cannot be stabilized, switch it to Manual upload (you provide screenshot) and upload one image.
`Next` is stuck in Screens, usually due to these 3 types of problems
1. The Name of screen is empty. 2. There are duplicate names, causing shot key conflicts. 3. Order is illegal. Clean up these basic issues before doing deep link, upload and copy.
Screens page, containing a Source dropdown menu.Previous
Getting Started and Complete Process
From opening the app for the first time to running through the first project, first see the entire operation link, preconditions and project directory structure at once.
Next
Auto capture, Deep Link and material input
This step determines how to get the original screenshot, and it is also the easiest place to get stuck. Explain deep link, capture set, upload rules and special branches in one go.