Workflow operations
Preview, template adjustment, rendering and export
After the original screenshots and copy are in place, this final step determines the quality of the finished film and the delivery catalog.
First decide which sizes to participate in preview and rendering in the `Template` panel
| area | effect | how do you want to use |
|---|---|---|
iOS sizes / Android sizes / Other sizes | Enable or disable an output size. | Turn off unnecessary sizes as soon as possible to avoid excessive burden on Preview and Render. |
Capture binding | Bind a preview size to a specific capture set. | If there are multiple sets of original images of the same size, they must be bound explicitly; otherwise Preview may prompt No capture set bound.. |
Style | Switch between template styles. | It is most efficient to choose a style first and then make fine adjustments. |
Primary color | Quickly replace your main color or gradient. | It is suitable to set the general direction first. Go to the tuning panel of Preview to change the details. |
Size switch will directly affect subsequent processes
When a size is disabled, it disappears from Preview, Render, and Export. Make sure you don't really need it anymore before closing it. The app will also give a confirmation pop-up when closing.
`Preview`: This is the place where you spend the longest time every day
Select preview context first
The top Preview card selects size tabs first.
Then cut locale tabs.
Finally, click on the image you want to adjust in the shots horizontal scroll bar.
Preview page example 1: size tabs, locale tabs are linked with the editing area.Use the top controls to see clearly
Refresh: Re-render the current preview.
100% / Fit / 150% / Zoom slider: Only affects the zoom you see on the screen, not the export resolution.
Selected shot will tell you which picture is currently being adjusted.
Drag visual elements directly on the canvas
Preview supports dragging screenshot, widget, title, and subtitle directly.
When dragging, the Quick inspector on the right will automatically focus on the corresponding layer.
Select `Editing Mode`
Quick: Only one focus panel is displayed at a time, suitable for daily high-frequency fine-tuning.
Advanced: Expand all control items, suitable for detailed template construction.
Preview page example 2: tuning / history operation on the right.Decide on the scope of modifications
Apply To / Apply edit below the preview area can spread the current changes to This shot / All shots, Current locale / All locales, This size / All sizes.
This step is very critical, as it determines whether you are changing a 'single special case' or a 'whole system.'
| Common panel on the right | use |
|---|---|
Editing Mode | Switch between Quick and Advanced. |
Inspector Focus | Specifies the currently focused Background, Screenshot, Widget or Text. |
Apply To | Spread the tuning of the current shot / locale / size to other targets. |
History | Supports Undo latest, rollback to earlier state, Clear. |
How to locate the source of dislocation as quickly as possible
First, let’s just look at one locale + one shot + one size. Confirm whether the problem is caused by the background, screenshot cropping, text length or widget. After you can reproduce it stably, use Apply edit to extend the correction to other locales/sizes. Don’t make random changes to the overall situation as soon as you get started.
Device borders, batch sync and history rollback
- Screenshot style Supports
None,Shadow,Depth,Frames. - After switching to
Frames, if there is no corresponding resource locally, the app will automatically try to synchronize the default frame catalog, and then let youChoose frame. - In addition to cross-size synchronization, Batch Actions also has a complete History panel. During continuous fine-tuning, History automatically records key states.
Undo latestis suitable for undoing the latest step; the rollback button on the right is suitable for jumping back to an earlier node.
`Render` and `Diagnostics`: do intermediate verification first, then consider delivery
Select the size to render at
If nothing is selected in the Render sizes menu, it is equal to All ready sizes.
If you only want to check one size question first, just check it.
Click `Render`
Rendering will write the results to the renders directory.
Click Reveal renders to open it directly.
See `Diagnostics`
Missing screenshot means that the original image is not yet available.
Overflow The description text is out of the frame. You need to go back to Preview to adjust the font weight, font size, width or copy length.
Render is not equal to Export
Render mainly helps you confirm whether the final synthesis is correct locally; Export will generate a directory structure suitable for delivery or uploading to the store. It is recommended to render first and then export.
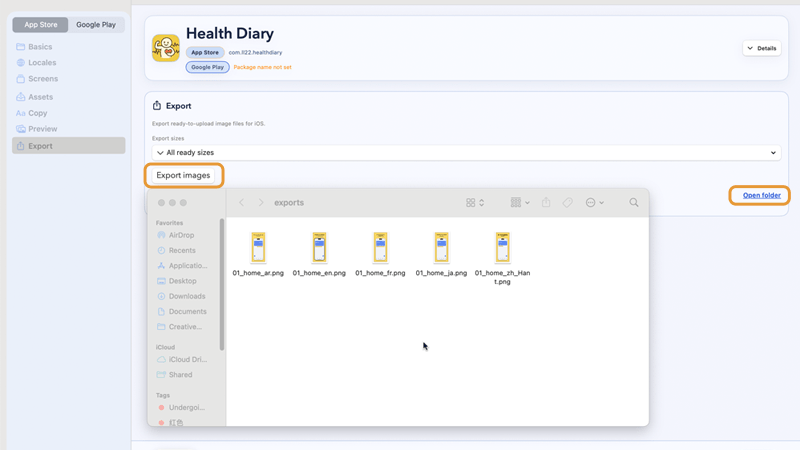
`Export images`: How to generate the final delivery directory
Export will first verify the account limit, then trigger a rendering, and then copy the final file to exports/<timestamp>/.... This will be blocked when you are not logged in or your free quota is exhausted.
Click `Export images`
If you are not logged in, the app will prompt Sign in to export images. and enter the login process.
If the Free monthly successful export quota is exhausted, the paywall will be upgraded.
Wait for two stages of progress
The first paragraph is Preparing images..., which is essentially doing the final rendering.
The second paragraph is Saving files..., which copies the results to the export directory.
Check 3 locations after export is complete
Status text: For example, Saved 48 images. or Saved 48 images with 2 warning(s)..
Save path: Display the final directory.
Open folder: Open the export directory directly.
Export directory example
text
exports/
  2026-04-09_14-32-11/
    ios/
      ios_6.9/
        en-US/
          01_home.png
          02_paywall.png
      ipad_12.9/
        en-US/
          01_home.png
    android/
      phone_6.5/
        en-US/
          01_home.png
          02_paywall.png
      play_feature_graphic/
        en-US/
feature_graphic.png| Export tips | what does it mean | what to do |
|---|---|---|
No ready sizes. Upload screenshots for at least one size before exporting. | There aren't enough original figures for at least one size. | First go back to Assets or Auto Capture to complete the raw image. |
Export blocked. | Account verification failed. | Check your login, plan and monthly limit. |
Saved ... with warning(s). | The export is complete, but there are still missing screenshots or text overflow. | Go back to Diagnostics to check the specific problem. |
Export failed. | An error occurred while rendering or copying the file. | Click Open diagnostic files to see renders and logs. |
Render/Export success status example.Previous
Copy import, multi-language translation and copy preview
Feed the title and subtitle of each locale / shot into the project, and try to standardize the translation work.
Next
Login, billing, support and invitation code
All account-related actions are entered from the avatar in the upper right corner of the home page. Here we talk about the login method, export quota, payment, Support Ticket and invitation rewards.