Get started
Getting Started and Complete Process
From opening the app for the first time to running through the first project, first see the entire operation link, preconditions and project directory structure at once.
What is this app responsible for?
The core workflow of Store Screenshot Studio is: first define the platform, language, Screens and copywriting in the local project, then decide whether each image comes from Auto Capture or Manual Upload, and finally in Preview, Render and Export to adjust styles and export.
- Project data is saved in the local
.autostoreshotsproject folder and does not rely on cloud online editing. - Accounts, billing, export quotas, invitation rewards and support all use the same backend, which will affect both the app and the official website.
- Logging in is not a prerequisite for creating a project, but the account balance will be verified before exporting.
- Currently, macOS apps are distributed through the Downloads page; all Auto Capture, Manual Upload, Preview, and Export processes in the document are based on this download version.
What to prepare before you start
| project | Recommended preparation | Why prepare |
|---|---|---|
| macOS app | First install the latest build from Downloads | All subsequent project configuration, preview, rendering and export are completed within the macOS app. |
| iOS automatic screenshot | Xcode / Simulator, and the target app has been manually run on the target Simulator at least once | The app needs to be launchable on the Simulator before it can be automatically run for the first time; the first-run popup will also explicitly ask for this. |
| Android automatic screenshot | Android Studio, adb, at least one launched and unlocked AVD or device | The Android Device drop-down items in capture sets come from adb devices. |
| Target app Deep Link | Prepare at least 1 link to the target page for each Auto screen | Auto Capture is essentially a batch process of 'switch language/reset status/open deep link/wait/take screenshot'. |
| Sample data or demo account | It is best to prepare a set of demo data that can stably reproduce the page state. | Complex pages often need to use Run setup link before capture to switch the page to the correct state before shooting. |
| Account login | It is recommended to log in in advance before exporting | When not logged in, clicking Export images will pop up the login process. |
When running through the first time, first narrow the target to '1 language + 1 screen + 1 size'
The first onboarding and copy built into the code emphasize this. Run through the smallest closed loop first, and then enlarge to all languages and sizes. The debugging speed will be much faster.
What do you see when you open it for the first time?
Enter the `Project Workspaces` homepage
The home page will display existing project cards and a New Project card.
The avatar button in the upper right corner displays Sign In when you are not logged in. After logging in, clicking the same location will open Account Center.
There is a pencil icon in the upper right corner of each project card. Clicking it will open Edit Project.
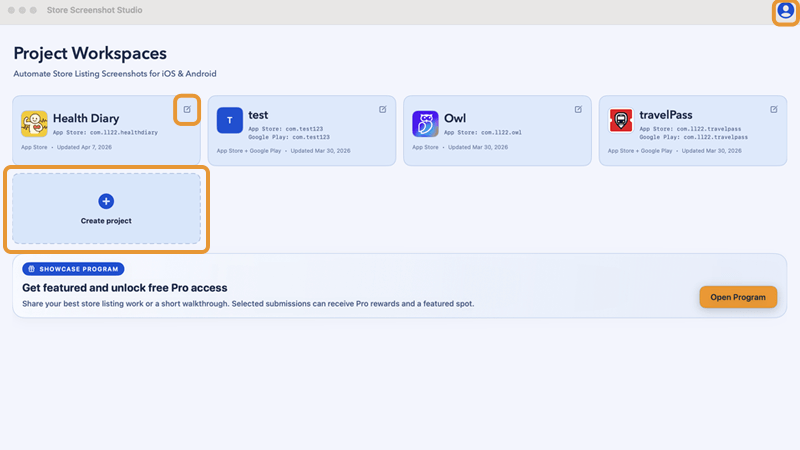
New Project, avatar in the upper right corner, pencil icon in the upper right corner of the project card.Understand what clickable areas are on the project card
Click the project body to enter the project workspace.
Clicking the pencil in the upper right corner will open the project settings.
Click the icon area in the upper left corner of the card to re-specify the source of the project icon. It supports selecting the iOS/Android project root directory or directly selecting the icon file. This click area is relatively hidden. For official documents, it is best to add a screenshot to mark it.
Determine whether you need to log in now
If you just create the project, enter the language, configure deep links and import materials first, you don’t need to log in yet.
If you want to export, view account rights, redeem invitation codes, submit Support Tickets or purchase packages, just click the avatar in the upper right corner to log in.
It is recommended to run the first project in this order
Create project
Click on New Project on the home page.
Fill in Project name.
Check Bundle ID (App Store) and Package name (Google Play) as needed to enable at least one platform.
Click Choose… to select the project directory, then click Save.
Checklist
- When iOS is enabled,
Bundle IDcannot be empty. Package namecannot be empty when Android is enabled.- When both platforms are closed, it cannot be saved.
First take a look at the project status in `Basics`
Confirm whether the current project will be App Store, Google Play, or dual-platform.
If the package name is entered incorrectly, click Edit Settings to correct it immediately.
If you selected the wrong project directory, click Change to select it again.
In `Locales`, first reserve 1 language for verification
By default there will be en-US.
If you want to do Chinese or Spanish first, add a target language first and leave only one enabled locale.
Define at least 1 page in `Screens`
Each screen must have at least a unique Name and a correct Order.
At least 1 screen is required to continue, and there is no hard upper limit of 4; the default project only generates 4 sample screens for you first.
Source first decides whether to use Auto capture (open Deep Link) or Manual upload (you provide screenshot) for your picture.
According to Source, go to `Assets` and fill in the content.
For Auto, go to Auto Sources and fill in the iOS deep link / Android intent URL.
For Manual, switch back to Screens and upload screenshot directly inside that screen card.
If you want to automatically capture different sizes, make sure at least one capture set exists (add one from Assets > Auto Capture when missing).
Enter the title and subtitle in `Copy`
The easiest way is to paste |-separated text into Final copy input and click Parse and apply.
If you want AI to translate for you, prepare a standard locale|shot|title|subtitle table and use your external AI/translation workflow, then paste it back into Final copy input.
Go to `Preview` to adjust the style, and then use `Render` / `Export` to finish
In Preview, first select the size, language, and shot to confirm that the layout is not misaligned.
Click Render to check Diagnostics first.
No problem, click Export images to generate the final delivery directory.
Why does the Next button sometimes not click?
Next at the bottom of the workspace will be intercepted based on the completion of the current step. For example, Locales must enable at least one language, and the names in Screens cannot be repeated. If Auto source is used in the Assets stage but there is no deep link or capture set, it will also prevent the continuation.
What will the project folder look like?
Each project is saved to a folder ending with .autostoreshots. When created, the app will automatically generate a fixed directory structure, and subsequent automatic screenshots, background images, renderings, and exported images will all fall here.
Default project directory structure
text
MyApp.autostoreshots/
project.json
raw/
  ios/
  android/
renders/
exports/
logs/
backgrounds/
frames/| path | use |
|---|---|
project.json | Real configuration sources for the entire project, including platform switches, Screens, Locales, Copy, Template tuning, capture sets, and more. |
raw/ios | iOS original screenshot input directory. Auto Capture and Manual Upload will eventually write the source image here. |
raw/android | Android original screenshot input directory. Auto Capture and Manual Upload will eventually write the source image here. |
renders | Intermediate products rendered by size and language; this is also the first place to look when debugging. |
exports | After each Export images, a timestamp subdirectory is generated, which contains the final delivery file. |
logs | Automatic screenshots and debug log related output. Keep this directory first if you encounter weird problems. |
backgrounds | The background image material imported into the template. |
frames | External device border resources. Used when selecting the Frames style. |