Workflow operations
Auto capture, Deep Link and material input
This step determines how to get the original screenshot, and it is also the easiest place to get stuck. Explain deep link, capture set, upload rules and special branches in one go.
`Auto Sources`: Fill in deep link / intent URL for each Auto screen
Only if a screen's Source is set to Auto capture (open Deep Link), it will appear in Assets > Auto Sources. What you have to do is to complete the opening path of each Auto screen on iOS and Android.
| Field | effect | When is it required? |
|---|---|---|
iOS Deep link | Used when Simulator automatically executes openurl. | The current project has iOS enabled, and the screen needs to run Auto. |
Android Intent URL | On Android, fill URL only (for example myapp://... or https://...). Do not paste adb command text. Do not use intent://.... | The current project has Android enabled, and the screen needs to run Auto. |
Wait (ms) | After opening the target page, how many milliseconds to wait before taking a screenshot. | It is recommended to fill in all Auto screens, and the default is 3000. If there is a lot of dynamic content, increase it appropriately. |
iOS does not support `https` universal link as Auto Capture deep link
This situation has been explicitly blocked in the code. The reason is not that the URL itself is invalid, but that iOS may pop up the system-level open-in-app confirmation box in the Simulator, causing batch tasks to be unstable. For iOS Auto Capture, please try to use app-scheme, such as myapp://product/42.
Built-in iOS deep link setup prompt
text
You are a senior iOS engineer. Update the *currently opened iOS project* to support deep links for existing screens, with minimal changes and no new files unless required.

Requirements
1) Add deep links only for existing screens (no new screens).
2) Use app-scheme deep links for automation (example: myapp://path). Do NOT use https universal links for Auto Capture.
3) Log route name + full deep link URL whenever navigation happens.
4) Support native + hybrid stacks (SwiftUI/UIKit, React Native, Flutter, MAUI/Xamarin, Capacitor/Cordova, Unity/Unreal, Qt) by integrating into existing navigation.
5) Avoid experimental APIs unless already used.
6) Final URL table must be plain text TSV: one line per screen, format <screen_key><TAB><url>.
7) Keep each URL as one single line with no spaces/newlines.

Output (strict)
- Use this plain-text block format for each screen (no markdown/code fence):
  page_name: <screen_key>
  deep_link_url: <url>
- Keep the same screen order as input
- One block per screen, with one blank line between blocks
Built-in Android deep link setup prompt
text
You are a senior Android engineer. Update the *currently opened Android project* to support deep links for existing screens, with minimal changes and no new files unless required.

Requirements
1) Add deep links only for existing screens (no new screens).
2) Android Auto Capture accepts URL only. Prefer app-scheme deep links first (example: myapp://path).
3) https://... links are allowed only when verified to open the app directly (no browser fallback / no chooser interruption) on target build/device.
4) Do NOT use intent://... URLs.
5) Do NOT output adb commands (adb shell am ...) in the final link table.
6) Keep every URL as a single line (no spaces/newlines) and preserve query params.
7) Log route name + full URL whenever navigation happens.
8) Support native + hybrid stacks (Android native, React Native, Flutter, MAUI/Xamarin, Capacitor/Cordova, Unity/Unreal, Qt) by integrating into existing navigation.
9) Final URL table must be plain text TSV: one line per screen, format <screen_key><TAB><url>.

Output (strict)
- Use this plain-text block format for each screen (no markdown/code fence):
  page_name: <screen_key>
  intent_url: <url>
- Keep the same screen order as input
- One block per screen, with one blank line between blocks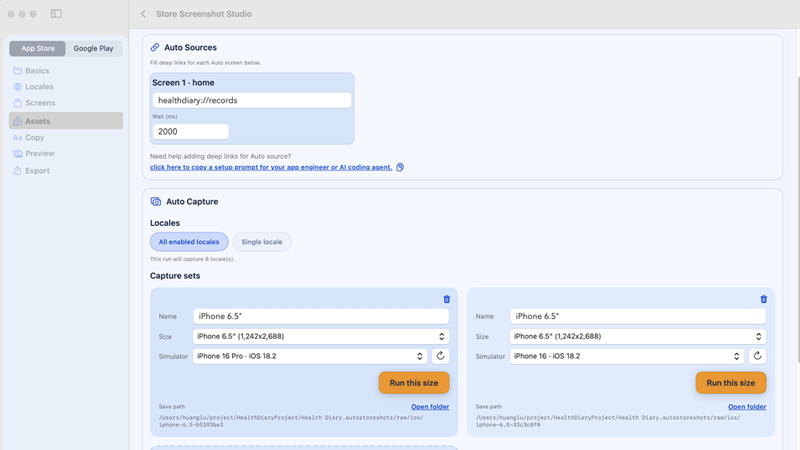
Assets > Auto Sources and Capture sets on the same screen example.`Capture sets`: Manage automatic screenshot batches by size and device
Capture set can be understood as a task template of 'a certain size + a certain device + a certain set of operating parameters'. Without a capture set, there is no actual execution context for Auto Capture.
Add a new capture set
Go to Assets > Auto Capture.
If there is no capture set currently, the interface will prompt A recommended capture set will be created automatically for this platform. and provide the Add size card.
After clicking Add size, at least Name, Size and Simulator / Device must be filled in.
Configuration fields
Name: This is just the name for people to see, but it cannot be empty.
Size: Select the target output size. When the size is changed, the Capture binding will also be updated accordingly.
Simulator / Device: Select Simulator for iOS, or select an online emulator/device for Android (the list comes from adb devices). The refresh button on the right refreshes simulators/devices.
When Android and the Feature Graphic automatic source is enabled, you can also check Use as feature graphic source, which means that this set of sizes is responsible for generating the original source image of the Play feature graphic.
Run this set of dimensions
Click Run this size in the lower right corner of the card.
When running on a device for the first time, the Before first run on this device prompt will pop up. The iOS copywriting will require you to manually run the latest app first; the Android copywriting will require that the emulator has been fully booted and the deep link has been manually tested.
You can use Pause while running; you can use Continue or Restart after pausing.
View results and report errors
A progress bar, status text, and success/failure count are displayed at the bottom of each card.
Run errors will be displayed during running; Last run errors will be retained after running.
Open folder can directly open the raw screenshot directory corresponding to the capture set.
`Run this size` cannot be pressed, common reasons
1. There are currently no Auto screens. 2. Auto screen lacks deep link. 3. iOS uses https deep link. 4. Simulator / Android device is not selected. 5. Android package name is empty. 6. Another capture set is currently running.
`Advanced settings`: language switching, reset status, sample data, status bar, device maintenance
| set up | Where | Suggested how to use |
|---|---|---|
Language switch mode | Assets > Auto Capture > Advanced settings | App launch is faster, suitable for situations where the app startup parameters can correctly access the language settings; System override is more stable, suitable for situations where complex apps or language refreshes are incomplete. |
Reset app for each language | Same as above | Clear app data every time you switch languages, suitable for apps that cache onboarding, login status or AB data. iOS usually requires you to provide a .app fallback, and Android requires a package name. |
Run setup link before capture | Same as above | Before officially taking Screens, execute a 'Sample Data Preparation/Login/Default State' deep link. Best for complex pages. |
Override status bar | Same as above, iOS only | Make the iOS screenshot status bar more unified. |
Device Maintenance Tools | Same as above | Focus on simulator boot/shutdown, open Simulator, open Android Studio, start AVD, and select .app / .apk fallback. |
`Run setup link before capture` example
text
# iOS setup deep link (optional)
myapp://demo/bootstrap?market={locale}&user=marketing-demo

# Android setup intent URL (optional)
myapp://demo/bootstrap?market={locale}&user=marketing-demo{locale}will be automatically replaced with the locale currently being processed each time it is run, such asen-US,es-MX.Setup wait (ms)is the additional waiting time after setup link execution, the default is at least 1000ms. In scenarios where page status switching is heavy, it is recommended to increase the time to 2000-4000ms.- If your sample data requires logging in, switching environments, switching experiment groups, and then entering the target page, give priority to folding these actions into the setup link instead of stuffing them into the deep links of each screen.
Recommended practices for “What should I do if I need to fill in sample data in the app?”
Don’t leave “entering sample data” to humans. Prioritize R&D to provide a setup deep link, prepare the demo data, login status, mock user, and Feature Flag at once, and then execute it in Run setup link before capture. In this way, each locale will automatically enter a unified state before officially taking Screens.
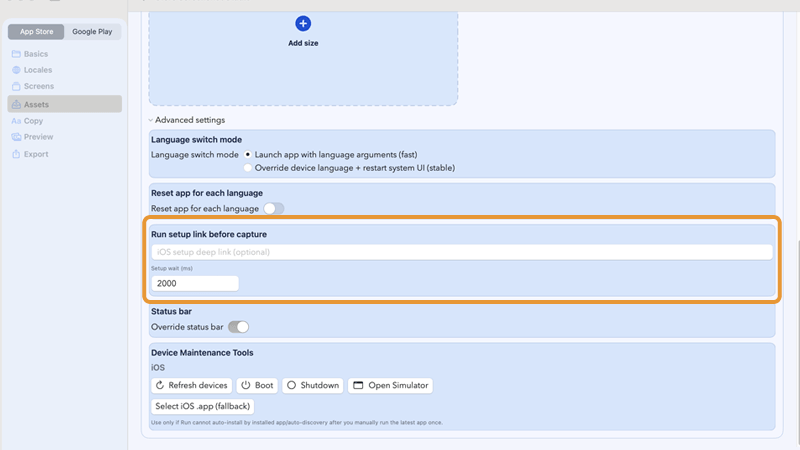
Advanced settings fully expanded example, key field: Run setup link before capture.`Manual upload (you provide screenshot)`: upload source directly in each screen card
When a screen is set to Manual upload (you provide screenshot), upload the source image directly in that screen card under Screens. There is no separate Manual Upload panel anymore.
Set screen source to Manual
In Screens, change Source to Manual upload (you provide screenshot) for the target screen.
The screen card will immediately show upload controls.
Upload one screenshot in the screen card
Click Upload screenshot / Replace screenshot in the same screen card.
Current rule is simplified: one uploaded screenshot is copied to all enabled locales and all selected output sizes.
The card also shows coverage status so you can confirm whether all target files are ready.
Need different screenshots by size?
Use one-size-at-a-time workflow: keep one size/capture set, run/render, then switch to another size and replace manual screenshot again.
This keeps the first version simple while still supporting size-specific source differences (for example iPhone vs iPad).
Current manual upload model (per screen)
text
Screen: home
Source: Manual upload (you provide screenshot)
Upload: 1 screenshot
Apply to: all enabled locales + all selected sizes
Feature Graphic default model (Android)
text
Feature Graphic card
Source (default): Auto capture (open Deep Link)
Requires: Android Intent URL + wait in Assets > Auto Sources
Optional branch: switch to Manual upload (you provide screenshot) and Upload image- Feature graphic only appears in the Google Play scenario.
- When
Feature Graphicis enabled, source defaults to Auto. Manual is an optional fallback. - For manual app screens, each card provides
Upload screenshot/Replace screenshotandClearactions. - For Feature Graphic manual mode, the card provides
Upload image/Replace imageandClearactions. - If a page cannot be stabilized with deep links or setup links, switch that page to
Manual upload (you provide screenshot)instead of forcing full automation.
Deep Link principle, sample data, skipping launch screen and common pitfalls
The deep link here refers to the 'page jump link of the app being photographed', not Store Screenshot Studio's own account deep link. The execution logic of Auto Capture can be roughly understood as: switch language -> optionally clear data -> optionally run setup link -> open screen deep link -> wait -> take screenshot.
| question | Recommended practices |
|---|---|
| The page requires login or demo data filling | Make login, preset fake data, and cut experimental group into setup link, and fill in Run setup link before capture. |
| The same page has different routes for iOS / Android | Fill in iOS Deep link and Android Intent URL respectively. Do not force the URLs on both ends to be exactly the same. |
| Want to skip the launch screen / first boot page | Prioritize the deep link of the first Auto screen directly to the page you really want to shoot; if you still need to rely on a certain pre-state, use the setup link to prepare it first. Before the first shot of iOS, it will automatically wait for the startup transition to complete before starting the timing. |
| There's never enough waiting time | Prioritize increasing the Wait (ms) corresponding to the screen instead of adding a large delay to all screens across the board. |
| Auto Capture is always interrupted by the system confirmation box | iOS uses app-scheme deep link instead and avoids https universal link. |
| Some pages cannot be deep linked at all | Just change it to Manual upload (you provide screenshot) instead of forcing it. |
Recommended deep link design output
text
Screen -> URL
home -> myapp://home
product_detail -> myapp://product/42
subscription_paywall -> myapp://paywall?entry=screenshot
settings_notifications -> myapp://settings/notifications
When should you give up Auto and switch to Manual directly?
If the target page strongly relies on real-time server status, verification code, third-party WebView, uncontrollable advertising, map positioning, or content that must be manually entered, you should switch to Manual upload (you provide screenshot) first. Don't force a naturally unstable page into batch processing in pursuit of full automation.
Previous
Project, Platform, Language and Screens Settings
Get the project skeleton right. This determines whether each subsequent step can go down smoothly.
Next
Copy import, multi-language translation and copy preview
Feed the title and subtitle of each locale / shot into the project, and try to standardize the translation work.